Save 25% when you buy 2+ supplies.

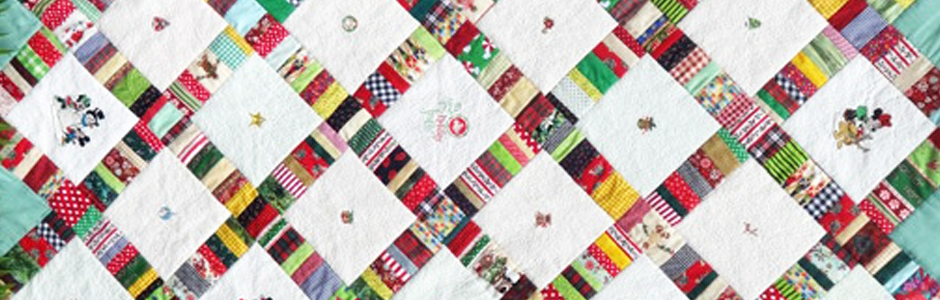
Step-by-step instructions to make a stippled Disney character quilt
Create a festive Disney character quilt with your Brother Dream Machine. Learn to stipple around designs, use traditional free-motion stitching, or skip the stitching altogether. Let the celebrations begin with this perfect holiday keepsake.
Discover inspiring projects to create with your Brother machine. From cutting and crafting to sewing, embroidery, quilting, labelling and more, find new ways to bring your ideas to life.
Use your Brother machine and our quilting and stippling tips to create a Disney Christmas quilt.
What You'll Need
Brother Aveneer EV1
Brother SA446C Large Quilt Embroidery Frame 8" X 8"
Brother SA125 ¼" Quilting Foot
Brother SA140 Walking Foot or Brother SA195 MuVit Open-Toe Dual-Feed Foot
Fabric—white muslin or quilting cotton (background), green gingham for side triangles, 2 yds. 45" wide red gingham for backing, red, green, yellow, Christmas print scraps for border
Very lightweight cotton batting
Heat erasable marking pen
Basting spray
Rotary cutter
Mat
Ruler
Finished size 67" L x 40" wide
Love this project? Get more tutorials ideas, member-only deals, and free shipping on every order.
Disney Holiday designs to be stippled in white:
DMCRT01 Santa Mickey
DMCRT02 Santa Minnie
DMCRT03 Pluto for Christmas
DMCRT04 Goofy Santa with presents
DMCRT05 Holiday Fun
200811098 Minnie with Pluto
211914011 M&M building snowman
Small designs to be stippled in green:
200910425 Candle
200910426 Candy cane
200910427 Mittens
231020029 Bell
200910433 Star
200910424 Gingerbread boy ornament
200910431 Star snowflake
200910432 Stocking
Small designs to be stippled in red:
200910471 Reindeer
200810113 Wreath
231020044 Teddy bear
200910470 Ornament (one extracted from two ornaments)
231020027 Christmas tree
200910430 Present
OTHER SOURCE
Brother Christmas Card #28
design Bcd28017 Santa (to be stippled in red)
design Bcd28011 Poinsettia and ribbons extracted from this design (to be stippled in red)
NOTE: Snowmen and Santas with white features were avoided around the design perimeter because white embroidery can disappear against a white background. A dark outline helps define these details, as shown by the disappearing star in Row 7.

1. Cut 23 squares, each 13" x 15" from the white background fabric. Starch and press.
2. Cut 23 squares, each 13" x 15" from the very thinnest cotton batting.
3. Cut 16 squares, each 7 ¼" from the green gingham fabric. Starch, press and set aside.
4. Assemble a laundry basket with red, green, yellow and Christmas fabric scraps larger than 3" on one side. Set aside larger pieces for the scrappy binding.
5. Set embroidery foot height to .040". Make this change on pg. 7 of the info sheet, the lined page icon at the top of your screen.
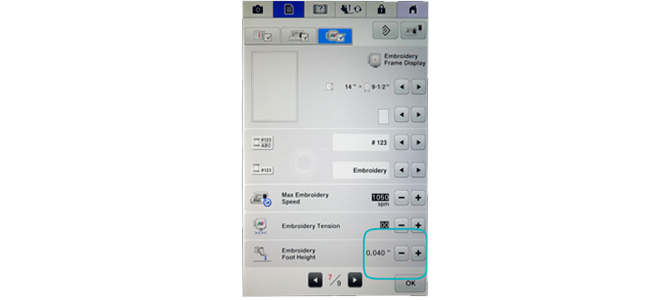
Hoop a 13" x 15" rectangle of batting and background fabric with no stabilizer in an 8" x 8" frame.
Select Christmas DMCRT05, the Holiday Fun design.
Go to Edit menu and click size. Rotate 45 °.
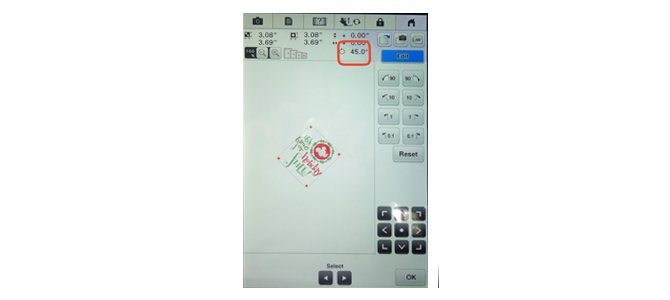
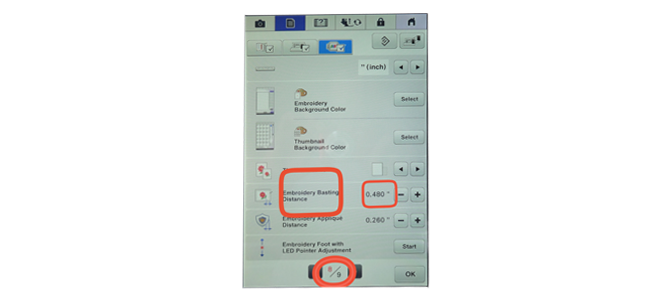
Edit to include basting frame as far away from design as allowed.
Note: Black thread was chosen for basting frame for photo visibility. White thread or thread the colour of the background fabric is a better choice as no remaining fibres will show when the basting stitches are removed.
Embroider design.
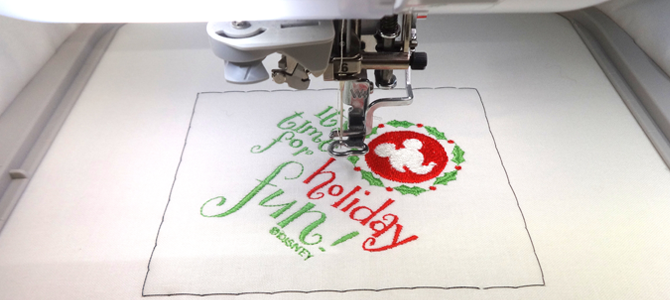
Remove basting stitches
My Design Center
Note: Remember that on most screens in MDC, the black arrow at the bottom of the screen will take you back to the previous screen. Open My Design Center.
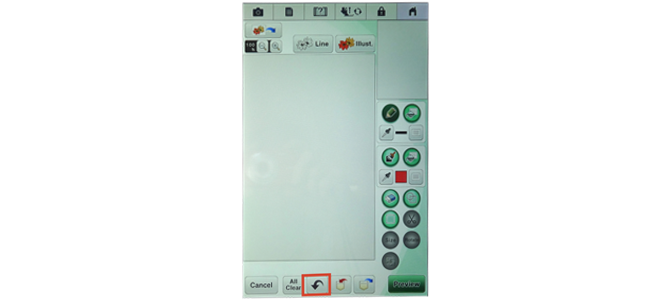
Scan design.
Tip: Make sure the needle is unthreaded before scanning or else it may leave a thread dragging across the embroidered design during the scan which will show up and cause considerable aggravation. If that happens, it’s best to remove the thread and rescan.
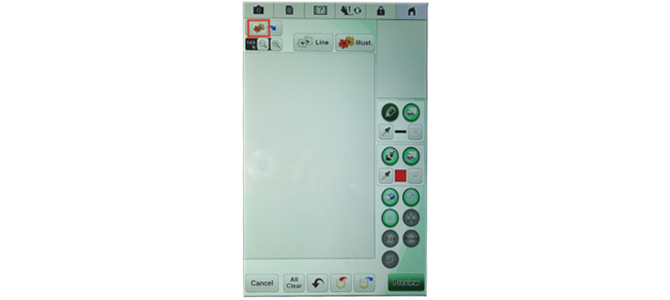
Select the illustration key which turns the design on the screen into embroidery, even if you have already stitched the design – this is step #1 of an easy way to add stippling to an embroidered design.
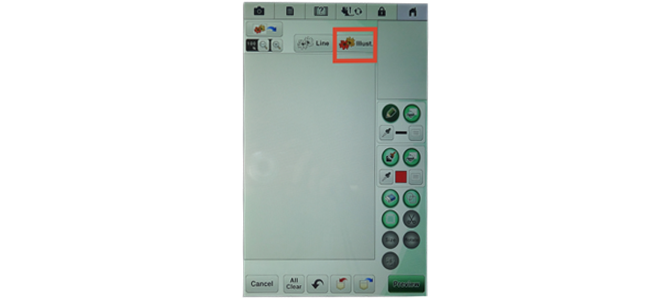
Frame (crop) the image with the corner handles. Press OK and "wait a while" as instructed.
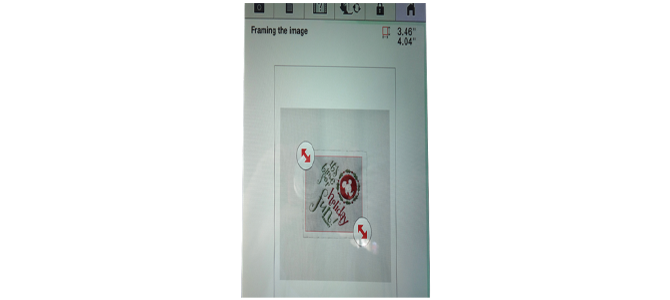
Press OK again then Set.
Enlarge the view as much as 400% for better visibility of shadows. At 200-400% you will see stray shadow stitches that are not visible at 100%. They will haunt you when the stipple pattern detours around them.
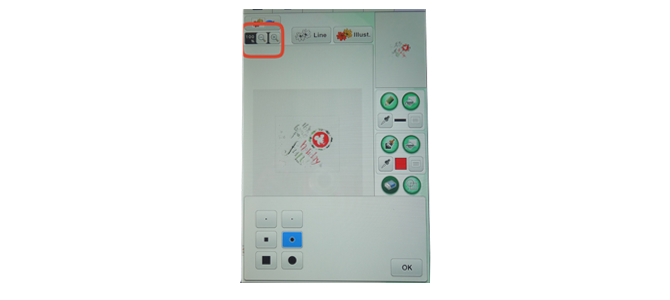
Engage the eraser key circled in orange to clean up the image. NOTE: Because the batting adds loft, the scan picks up shadows and reads them as stitches. The "shadow stitches" must be erased.
Several options will appear. Choose the larger erasers for larger areas, smaller for small areas. NOTE: Use of the magnification option makes it easier to erase more accurately.
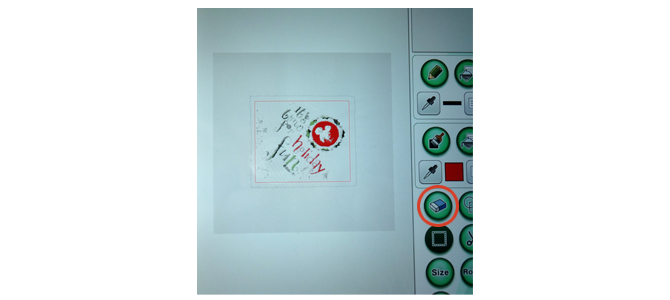
Use your stylus to remove unwanted portions of the scan. Remember that you have the black BACK arrow if your erasing goes too far and you erase a part of the original embroidery.
Lift the stylus frequently. Doing so sets the previous erasures. The BACK arrow will go back to the place where you last lifted the stylus.
Note: You may also switch to different erasers.
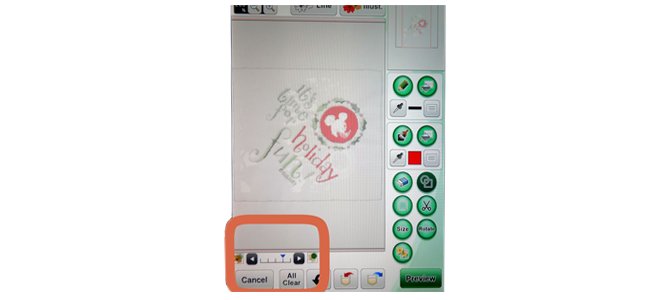
Notice the sliding scale at the bottom left of the screen. This allows you to brighten or darken images for better visibility.
Return the magnification to 100%.
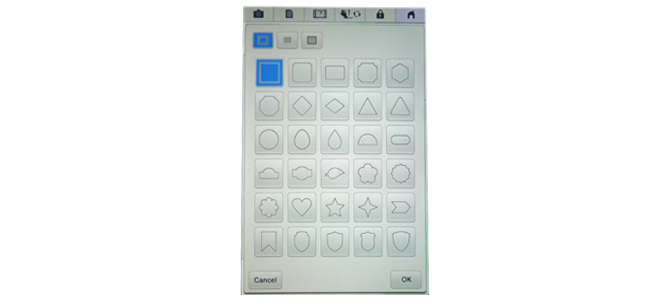
Select the region key circled in orange. The next screen offers options.
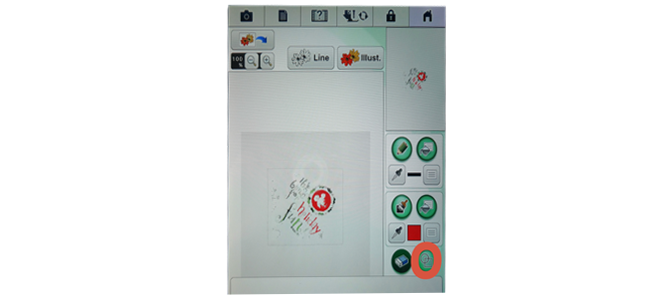
Select the options in blue because the block will be square. Press OK.
Click on the size button.
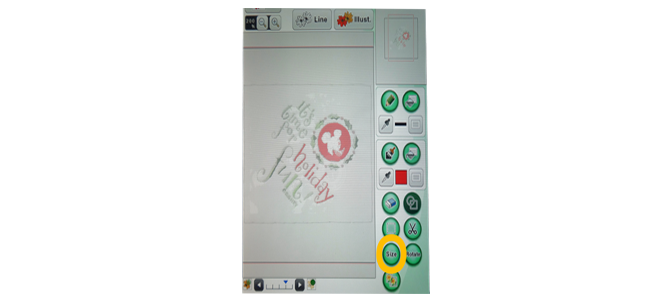
Resize the design to 6.90. Press OK.
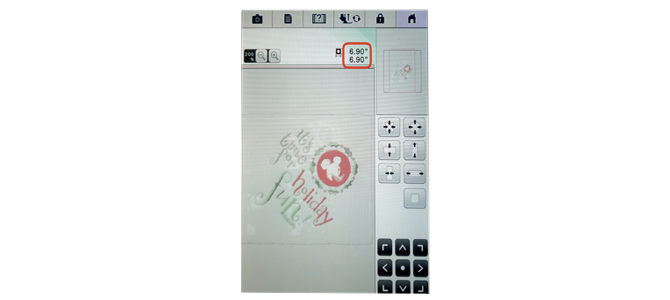
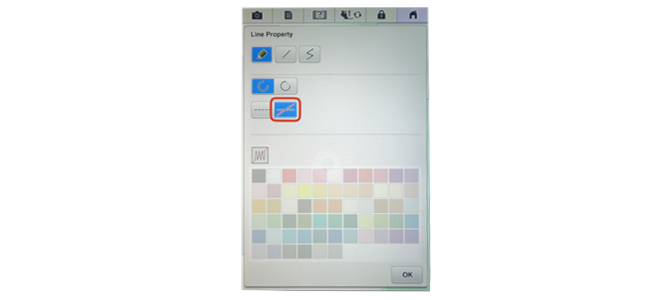
Select the Line Property key in the black box below. Another screen will appear.
NOTE: The red box was added for clarity. The line on the screen is a single black line, which only identifies the area to which you want to add stippling. This creates a light grey box around the area to be stippled. Since you don’t want that box to be stitched...
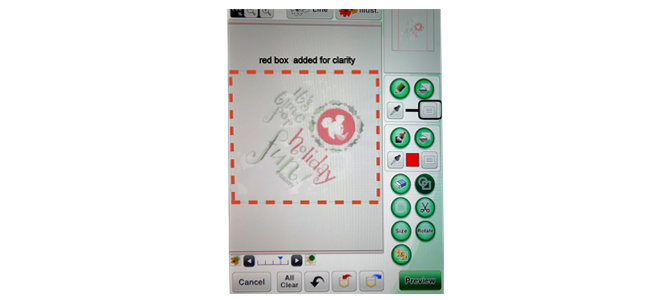
…select the no-sew box option boxed in red. Press OK.
Select the bucket tool key, circled in yellow.
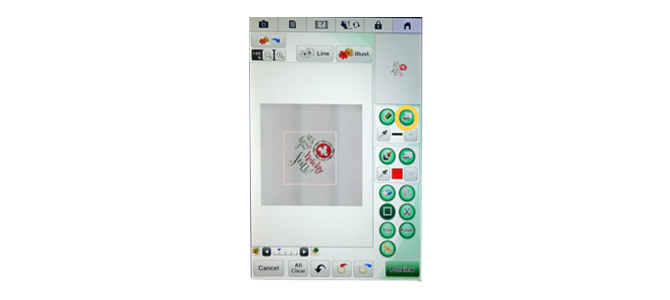
Apply that function by touching the perimeter of the box with your stylus. That line becomes a broken grey line which will not be stitched.
Select the region key in the purple box to create the stipple region. When this screen comes up select the highlighted icons. Press OK.
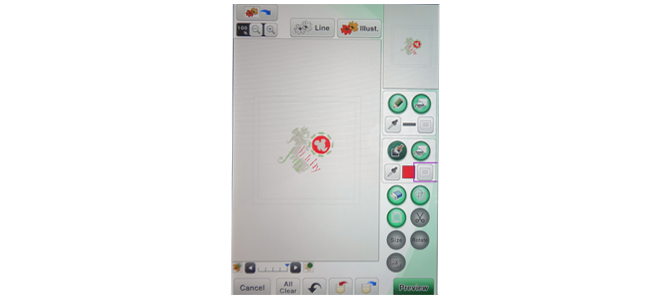
Select the stipple function in the purple box on the next screen.
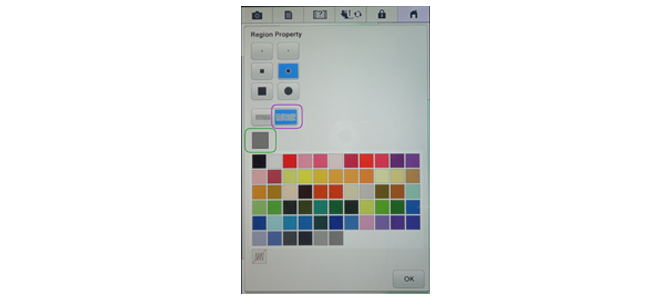
Select a colour for the stipple stitches. This does not have to be the actual colour you will use. It needs to be one which provides good contrast. You can see that grey, in the green box, has been chosen. Press OK. TIP: Don’t choose a colour that’s in the design, especially not the last colour. When the stippling was applied to the Goofy design and it was time to embroider, the grey just happened to be the last colour in that design. Since there was no colour stop between the grey stippling and the grey which was the last colour in Goofy, it was necessary to scroll through the grey Goofy colour to get to the stippling. Much easier to use a strongly contrasting colour.
NOTE: A lot of grey shadows appear within the design and were read as stitches. Removal and erasure of these was unnecessary because they were in the area where stippling was not applied. Only stitches outside the perimeter of the embroidery were removed.
Select the stipple fill key (pitcher).
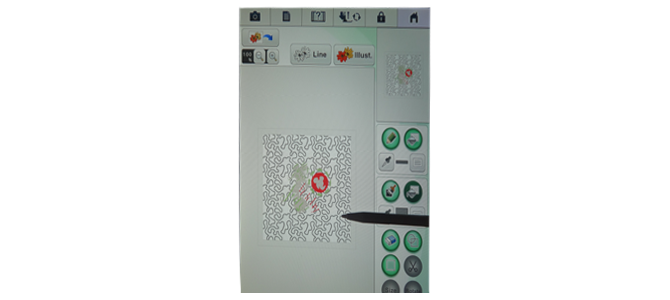
Touch next screen with stylus to insert stippling.
Note: The stippling disregards the embroidery design. That will be remedied in upcoming steps.
Select PREVIEW at the bottom of the page. It will inform you that the image will not be saved as you leave My Design Center for embroidery. Click OK to continue.
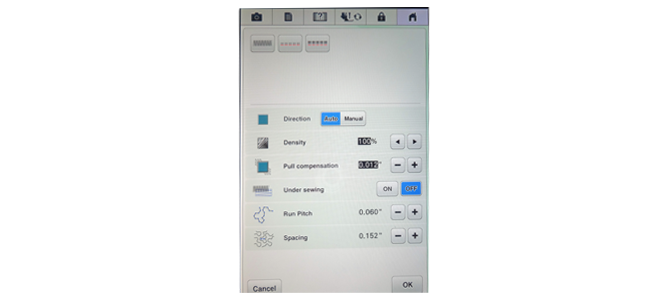
Chose the run pitch (stitch length) and spacing of the stippling. Leave the defaults or make other selections. Because the designs are relatively small compared to the size of the block, a shorter stitch length and closer spacing were chosen here, as shown in the orange boxes. Make your selection and press OK. Then "Please wait a while," while the information loads.
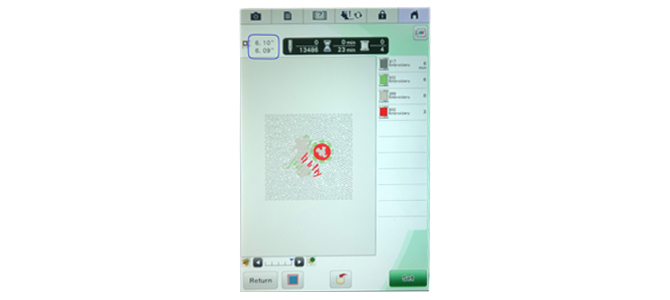
See that the stipple pattern surrounds the design but does not stitch over it. Tap SET.
ALERT!!! Before you tap SET, note the size in the upper corner. It should read 6.80" x 6.80". If you forget to hit OK when you resize it, the design will be stitched in the wrong size. You may need to go back to Scan.
A message will appear saying, "Converted to the embroidery pattern, and My Design Center will be exited. OK to continue to embroidery edit screen?" Sure, press OK.
Note: Are you concerned that the Holiday Fun design you have already embroidered is included in this design? Worry not. We’ll just scroll through all colours except the stippling stitched.
Tap on Embroidery at the bottom of the screen, because at last the time has come to embroider.
Note: The large Disney designs were stippled with a silvery white thread. The small designs were stippled alternately in gold and green.
Now you know how to add stippling to an embroidered design. Repeat this process for the remaining quilt blocks.
Overview
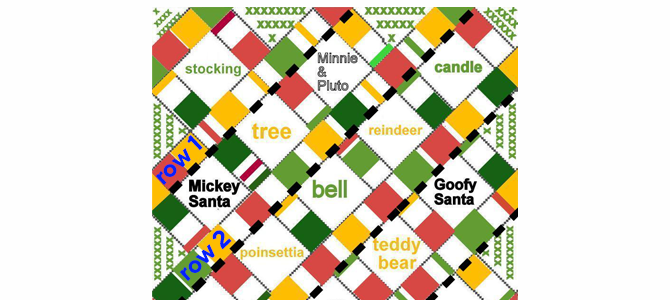
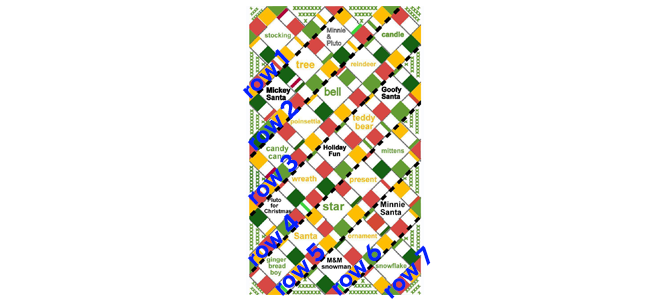
This illustration/diagram below may not be the best-looking, but it has the essential information you’ll need.
A. The green Xs indicate green gingham. Those 7 ¼" squares will be trimmed into triangles near the end of the quilt top’s construction.
B. The text colour in each embroidered block indicates the colour of the stippling.
C. The rows are constructed first by joining the blocks. To the first and last embroidered block add another scrappy sashing. These blocks already have batting but there is none below the added sashing or the gingham square which will be joined. So before adding the green gingham, join a batting scrap to the existing batting in the row. This will rest beneath the trimmed block.
D. Each row begins with a green gingham block, vertical sashing, embroidered block, vertical sashing, embroidered block, etc. ending with a gingham block. The diagram shows triangles at the end of each row, but you begin with a square and later cut it to the triangular shape.
E. After each row is constructed, the horizontal sashing is joined at the bottom of the row. Three inches of sashing must be joined to each of the gingham squares. Two rows differ from this pattern.
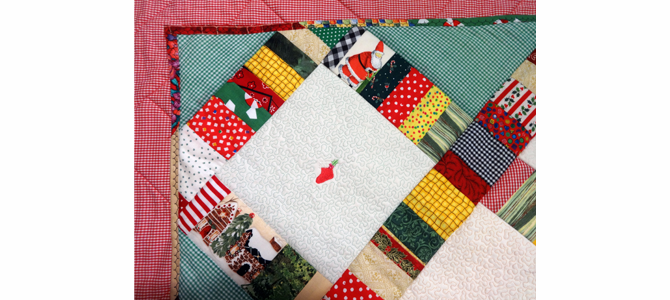
Row #1: The stocking block in row #1 has vertical sashing joined to each side as well as to the top. Make certain that the top sashing extends 3" beyond the embroidered stocking block. Then a 7 ¼" green gingham square is seamed to each of the three sides. Lastly, a row of horizontal sashing is joined to the bottom. Always extend the horizontal scrap sashing 3" inches beyond the block.
Row #7: The snowflake block has sashing joined to each side as well as the bottom. Remember, that sashing must extend 3". Then 3 gingham squares are added, one to each side as well one to the bottom of the block.
Begin with the 3 x 8" rectangles of foundation fabric. We used scraps from trimming the embroidered blocks and you could use other scraps for these small pieces.
Place two Christmas scraps right side together near the centre of the rectangle. Stitch along one side. This is the perfect place to use up those almost empty bobbins. Colour doesn’t matter.
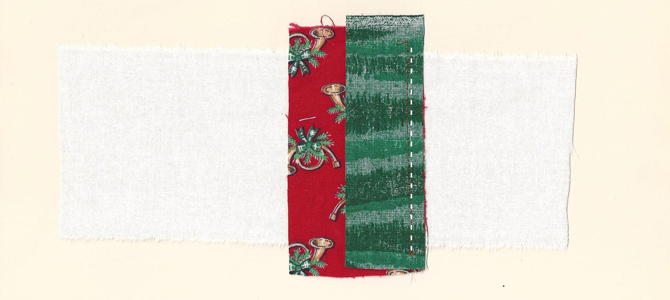
Finger press the seam open.
Continue in this manner, working from the centre on each side until the rectangle is covered. Vary the width of the scraps. Use wider scraps for the ends of the rectangle, allowing them to extend a bit beyond the foundation fabric.
Note: Take care to avoid having a seam less than 3/4" from the drawn line where another piece will be joined.
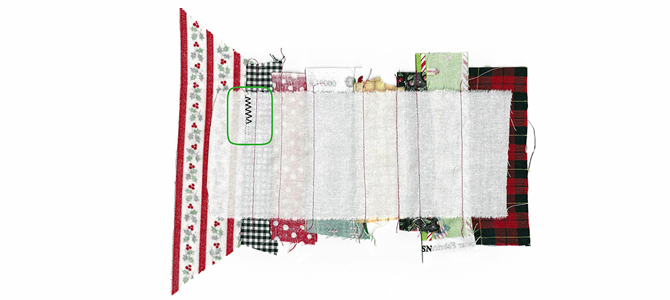
Trim the rectangle to 3"–the width of the foundation piece. Leave excess at ends. This extra length allows you to move the sashing to the right or left, whichever direction leaves you with a wider end piece.
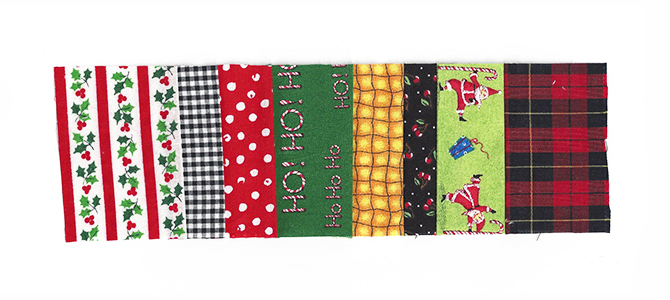
Join the border to the block with a ¼" seam. The border should begin at the top point of the diamond/square and be joined on the right side of the block.
Tip: We found it helpful to draw a line a scant ¼" above the top of the stippling. The raw edge of the sashing was then placed along that line and stitched.
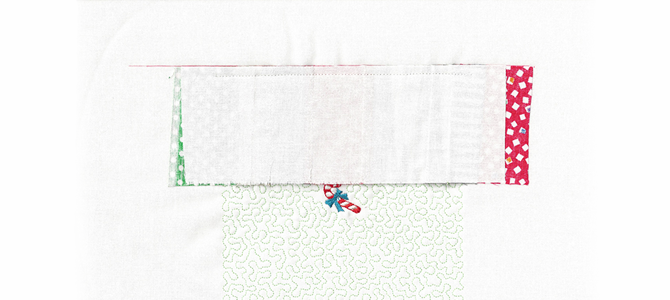
Press sashing to right side.
Notice the red cutting line goes through a wide scrap at the end of the sashing piece.
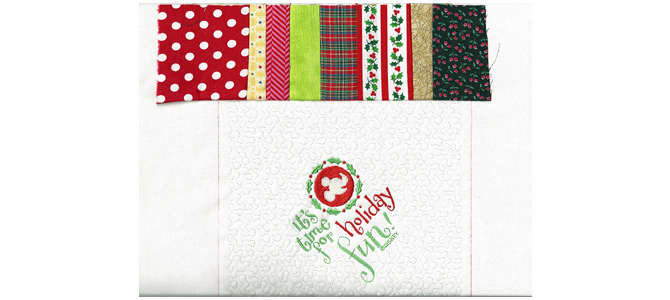
Trim 3 sides of the block ¼" from stippling as shown with the red line. Then trim away the excess fabric and batting above the scrappy sashing which was accurately cut at 3". The finished block should be 7 ¼" x 9 ¼".
Trim batting close to stippling. Trim batting ¼" from sashing pieces. This reduces bulk at the seams.
Repeat with each of the remaining 22 blocks.
Seam existing blocks together according to the diagram here. For example, row 2 will begin with Santa Mickey, followed by a border, then Christmas Tree, another border, and finally Minnie with Pluto, followed by a border. More elements will be added soon.
Note: As the blocks and sashing are joined, double check to be sure that the blocks measure 6 ¾" wide and the sashing is 2 ½" wide.
Prepare to add sashing and gingham block to the beginning of the row. Since the batting does not extend beyond the embroidered block, place the 3" x 8" sashing foundation fabric rectangle ¼" away from a 7" x 11" batting scrap.
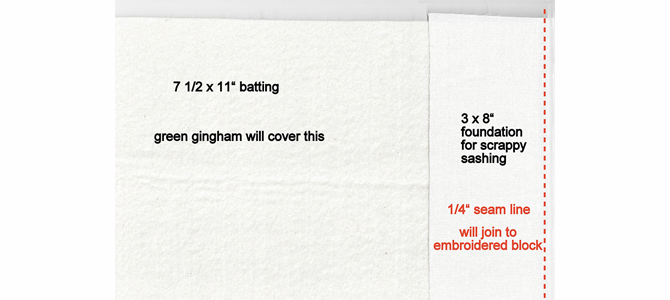
Stitch Christmas scraps to foundation piece. Trim even with embroidered block.
Join gingham to newly made vertical sashing. Press.
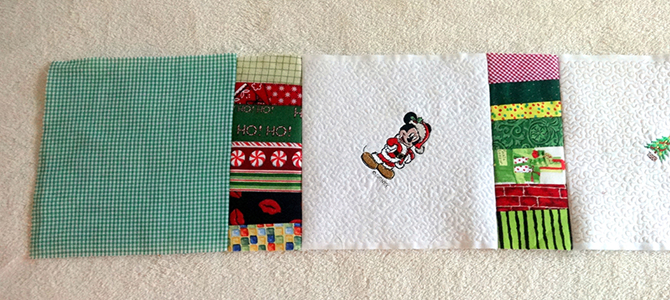
Prepare to add gingham block to end of each row.
The blue Xs on the partial diagram show where batting must be added. Add batting and additional sashing in this manner to the remainder of the blocks. Join the gingham to the sashing. This completes the row.
Prepare to join the gingham square to the top of the stocking block in row #1 and at the bottom of the snowflake block in row #7. First add batting by butting a piece of batting to the existing piece and join them with a triple zig zag stitch.
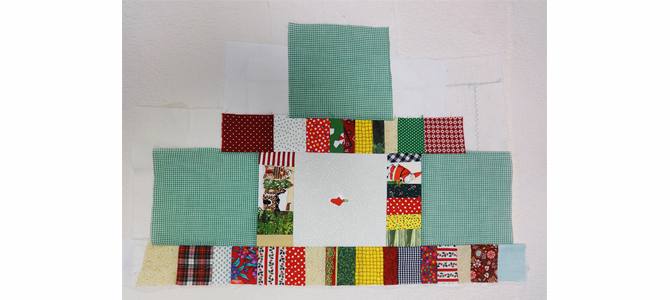
The horizontal sashing has been added but you’re not there yet so disregard that for now.
When constructed it will look like this:
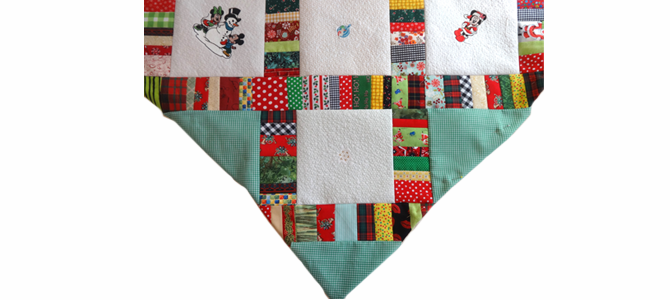
Construct long 3" wide border foundation pieces for sashing. Use scraps leftover from trimming blocks to size. Foundation fabric scraps were simply overlapped and stitched flat.
Cut batting to 2-1/4" and pin in place down the centre of the foundation fabric. This eliminates catching batting in the seams. Batting scraps were cut to size, butted together and joined with three-step zig zag to reach the needed length.
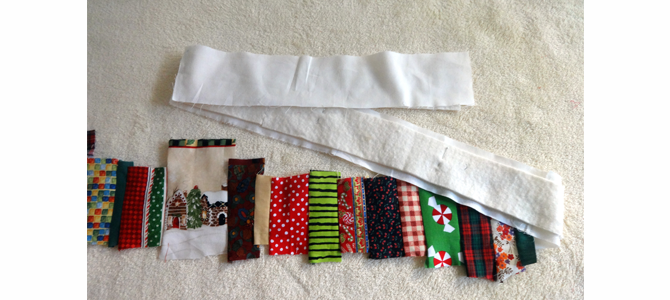
Trim scrap edges on long sashing piece to 3" as was done when trimming 3" x 8" border pieces.
Seam sashing to bottom edge of each row, extending an inch beyond each gingham block. Ideally the end scrap is wide.
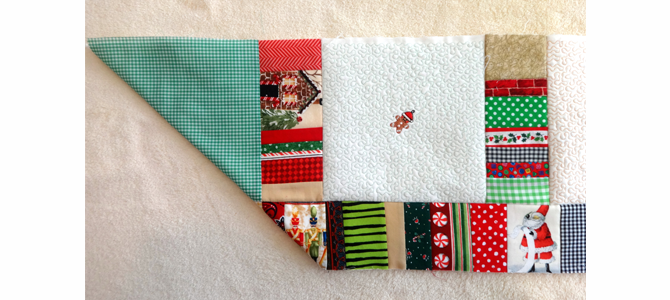
Join rows together in pairs. Again, corners are folded for easy visualization of how this will go together.
Square up quilt by rotary cutting the edges ¼" beyond the points of the gingham.
Measure the quilt top and cut backing 2" longer and 2" wider than that measurement.
Starch and press backing.
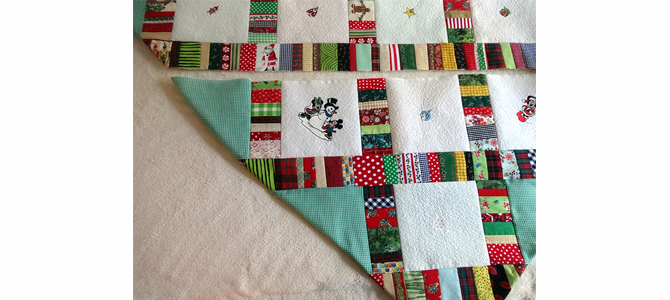
Place the quilt top face down on a flat surface.
Treat the back of the quilt with basting spray.
Centre the backing on top of the backing or
Pin liberally or baste by hand.
Use the walking foot or MuVit to stitch any machine quilting as desired. Ideally, stitch along each side of vertical and horizontal sashing. At the very least, stitch in the ditch along one side of each row of horizontal sashing and one side of each vertical sashing.
Cut larger scrap pieces 2-¼" parallel to the selvage for the scrappy binding.
Note: This is preferable because the lengthwise grain does not stretch as much as the crosswise grain. A variety of lengths from 4"-10" gives a pleasing look.
Seam scrap pieces together. Press seams open.
Measure the length of the quilt at the centre both vertically and horizontally. 67" x 40" Add 1" to each measurement and that is the yardage required for the binding.
Press binding in half lengthwise and pin one thickness to the BACK of one long side, matching raw edges at beginning of seam and at side. That leaves 1" for any necessary adjustment.
Stitch the binding to the back with a 3/8" seam.
Note: If the binding is too short, adjust it by easing in the quilt as the binding is joined. Use a part of the extra inch if necessary.
Cut away any excess side binding, making it even with the raw edge of the quilt bottom.
Repeat on the opposite side.
Fold the bindings to the right side of the quilt and pin in place.
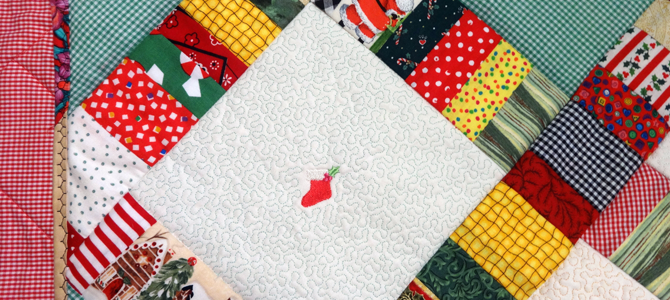
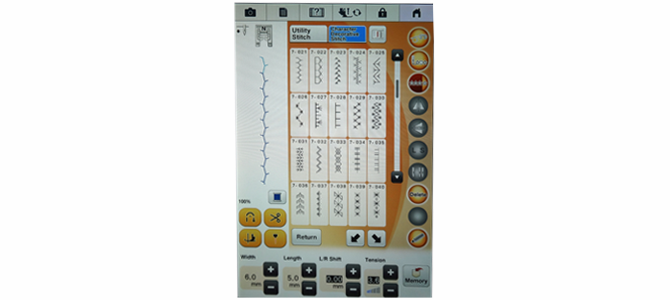
Stitch the binding to the quilt with a decorative stitch such as the one shown below W 6.0 L 5.0.
Pin the binding to the wrong side of the top. Fold under the extra ½"at either end and pin in place.
Stitch binding to the top and bottom as done on the sides.
Make a label for the back with your name, date, and any pertinent information. This is important for both memory making and marking that it’s yours in case it ever gets lost.
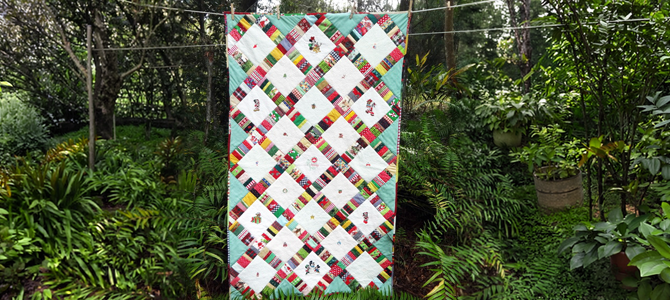
Your Christmas quilt is done! Now make some holiday memories.





Welcome to Brother Canada!
You're shopping from a location where delivery is currently unavailable (Nunavut, Northwest Territories, Yukon).
If you a shipping address in one of the provinces below, please select it to continue with your online purchase.
Otherwise, you can continue browsing to find a retailer, get info about Brother products, contact Customer Care and explore creative projects.
Bienvenue à Brother Canada!
Vous magasinez à partir d'un endroit à l'extérieur de notre territoire de livraison (Nunavut, Territoires du Nord-Ouest, Yukon).
Si votre adresse de livraison se trouve dans l'une des provinces suivantes, veuillez la sélectionner pour poursuivre vos achats en ligne.
Sinon, vous pouvez ignorer cette étape pour trouver un détaillant, vous renseigner sur les produits Brother, communiquer avec le Service à la clientèle et découvrir des projets de création.
 6-month extended warranty.



 6-month extended warranty.
 Your product has been added to your cart



 Your product has been added to your cart
Your product has been added to your cart
Thank you for registering your Brother product
Your product has been added to your cart
Your product has been added to your cart
Your product has been added to your cart
Thank you for registering your Brother product